
Discover how to install 240v outlet in garage safely, with planning tips, costs, and safety steps for a solid home setup.
Date
Nov 30, 2025
Author
RC Admin
Read
6 min

Let's be honest, that standard wall outlet in your garage just isn't cutting it for the big stuff. If you're tired of waiting forever for your EV to charge or tripping breakers with your power tools, it’s time to install a 240V outlet in your garage. This single upgrade delivers the serious power you need for things like Level 2 EV charging, turning an overnight trickle charge into just a few hours.
Why a 240V Garage Outlet is a Game-Changer
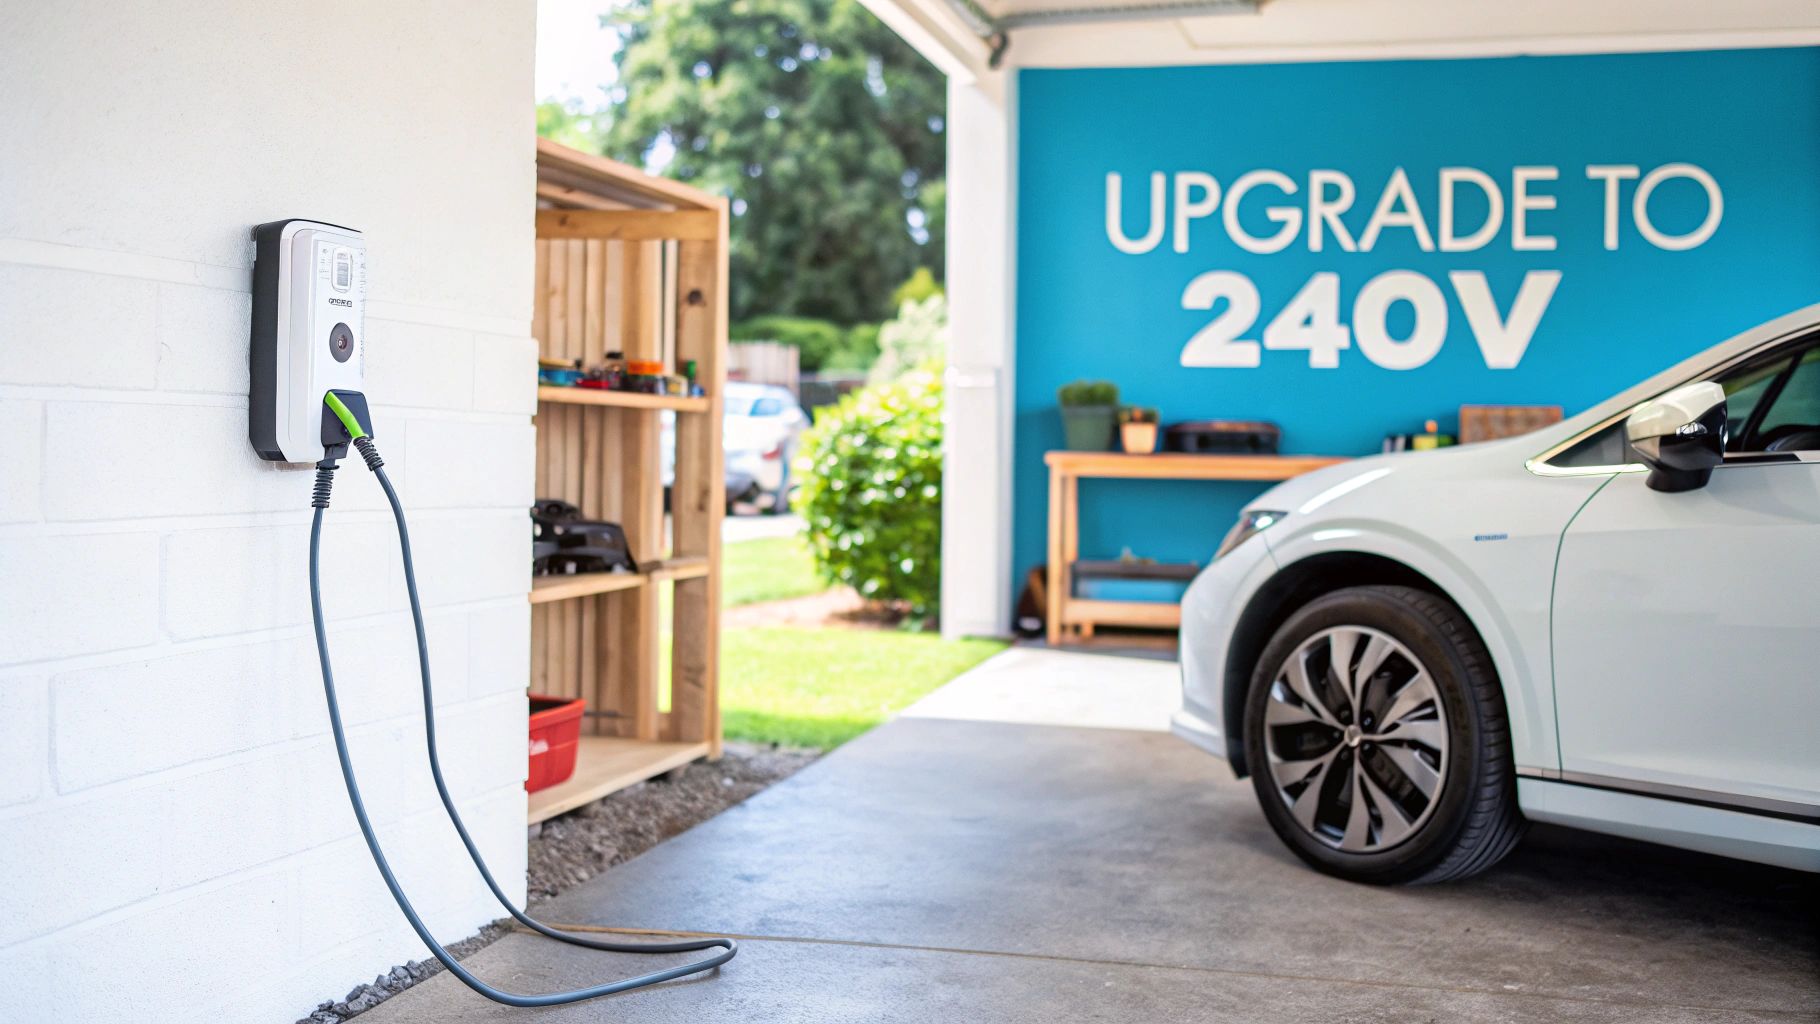
Without a doubt, the number one reason homeowners in California are calling us for this upgrade is the explosion in electric vehicle ownership. A regular 120V outlet—what we call Level 1 charging—can take 24 hours or even longer to fully charge an EV. For most people, that's just not practical for daily driving.
A 240V outlet brings Level 2 charging to your home, slashing that time down to just a handful of hours. It essentially transforms your garage into your own private, high-speed refueling station, making sure your car is topped off and ready to go every morning. This isn't a luxury anymore; for EV owners, it's a flat-out necessity.
More Than Just EV Charging
While EVs are definitely the main driver, the benefits of a 240V outlet don't stop there. For hobbyists, DIYers, and professionals, it unlocks the ability to run high-draw equipment that would instantly overwhelm a standard circuit.
Think about these garage powerhouses:
Welders: Most decent welders need 240V to operate properly, giving you the power to create stronger, cleaner welds on thicker metals.
Large Air Compressors: If you’re running tools like impact wrenches or paint sprayers, you need a powerful air compressor, and the big ones demand a dedicated 240V circuit.
Heaters and Kilns: Using your garage as a workshop in the winter? Or maybe you're into pottery? A 240V heater or kiln provides the juice needed without putting a dangerous strain on your home’s electrical system.
The move toward electrification is undeniable. The number of EVs on U.S. roads jumped from around 17,000 in 2011 to well over 2.3 million by the end of 2023. This trend has directly fueled the demand for professional 240V outlet installations as homes adapt to modern electrical needs.
A Quick Word on Safety and Doing It Right
Look, we get the appeal of a DIY project, but messing with 240 volts is serious business. This isn't like changing a light fixture. It involves getting into your home's main electrical panel, knowing the ins and outs of complex wiring codes, and making sure every single connection is perfect. One small mistake can lead to fire, electric shock, or frying your expensive new EV charger.
For homeowners in Los Angeles and Ventura County, following the strict local electrical codes isn't optional. An improper installation can get you in hot water with inspectors, void your homeowner's insurance, and create a massive headache when it comes time to sell your house.
This is exactly why calling a professional is the only smart move. A licensed electrician from RC Generators and Electric doesn't just guarantee a safe and code-compliant installation; we give you peace of mind. We have the experience to correctly assess your panel's capacity, choose the right breaker and wiring, and get the job done right the first time. For a deeper dive, check out our guide on installing an EV charger at home.
Investing in a professionally installed 240V outlet is an investment in your home's safety, capability, and future value. Let our team handle the tricky stuff so you can start enjoying the power and convenience you need.
Planning Your Installation Before Touching a Wire
The success of any project to install a 240v outlet in your garage is decided long before you ever pick up a tool. Solid planning isn't just a good idea—it's the single most critical step to ensure your new outlet is safe, up to code, and actually does what you need it to do. Rushing in without a clear plan is a recipe for expensive mistakes, dangerous electrical hazards, and some serious headaches.
First things first, you need to get familiar with your home's main electrical panel. This box is the command center for your entire electrical system, and its capacity is the ultimate gatekeeper for this project. If the panel is already maxed out, you can't just add a powerful new 240V circuit without causing major problems.
Can Your Electrical Panel Handle the Load?
Every electrical panel has a limit on the amount of power it can safely provide, measured in amps (A). Most homes today have a 100A, 150A, or 200A service. A new 240V outlet for something like an EV charger or a welder puts a significant new demand on that system. Pushing an older or smaller panel past its limit is a serious fire risk.
An electrician performs a load calculation to get an exact picture of your home's current energy use and determine if there's enough capacity for the new circuit. While the official calculation is pretty complex, you can do a quick spot-check:
Find the main breaker: Look for the largest breaker, usually at the top of the panel. The number on it (100, 150, 200) tells you your total service capacity.
Check for empty slots: You'll need two empty, side-by-side slots for a new two-pole breaker. If your panel is already completely full, you’re at a stopping point.
Think about your big appliances: Do you have an HVAC system, electric water heater, electric dryer, and an electric oven? Tacking a 50A EV charger onto a 100A panel that's already running all of that is rarely going to work.
If your panel is full or you have any doubts about its capacity, stop. This is your cue to call a licensed electrician. Our team at RC Generators and Electric can assess your system and tell you if a simple installation is feasible or if a panel upgrade is the necessary first step.
Navigating Permits in California
Here in California, particularly in Los Angeles and Ventura County, installing a new circuit absolutely requires an electrical permit. This isn't just red tape; it's a vital safety check. The permit process ensures a city or county inspector signs off on the work, verifying it meets the latest National Electrical Code (NEC) standards and was installed correctly.
Skipping the permit can come back to bite you. It could void your homeowner's insurance if an electrical fire occurs, and it will definitely cause problems when you decide to sell your home. Unpermitted work is a huge red flag for inspectors and buyers.
Choosing the Right Location and Components
The final piece of your plan is figuring out where the outlet will go and which parts you'll need. Think about practicality. For an EV, you'll want the outlet near the car's charging port so the cord reaches easily without creating a trip hazard. For workshop tools, place it close to your main work area.
Matching the components isn't optional—it's a critical safety requirement.
Breaker Size: The appliance dictates the breaker. A NEMA 14-50 outlet, which is very common for EV chargers, must be paired with a 50A two-pole breaker.
Wire Gauge: The wire's thickness has to be rated for the breaker's amperage. A 50A circuit requires 6-gauge copper wire. Using wire that's too thin is one of the most common DIY mistakes and a major fire hazard.
Receptacle Type: The outlet itself must match the plug on your appliance, whether it's a NEMA 14-50, a 6-50, or something else.
This is where professional guidance really pays off. An expert ensures every single component is correctly matched, building a system that's safe for the long haul. A little extra time spent on planning now prevents you from making dangerous guesses later.
If you’re ready to create a safe, professional plan for your new outlet, contact RC Generators and Electric today for a consultation.
Gathering Your Tools and Materials
Before you even think about touching the breaker panel, let's talk about getting prepared. Knowing what you need is half the battle when you decide to install a 240V outlet in your garage, and having everything laid out beforehand makes the job smoother and a whole lot safer.
Think of this as your pre-flight check. Whether you’re a seasoned DIYer or just want to understand what a professional electrician will be using, this is the essential gear.
Essential Safety and Hand Tools
First things first: safety. This isn't just about having the right tools; it's about having the right protective gear. High-voltage work is unforgiving, so don't cut corners here.
Here’s a look at the non-negotiables you'll need at your side.
Voltage Tester: This is an absolute must-have. A non-contact voltage tester (or "tick tracer") is great for a quick check, but a multimeter is what you'll use to confirm a circuit is completely dead. Never, ever trust a breaker that says it’s off—always test.
Insulated Screwdrivers: You'll need both Phillips head and flathead screwdrivers with insulated handles that are properly rated for electrical work.
Wire Strippers & Cutters: A good pair of wire strippers designed for the gauge of wire you're using is critical for clean, solid connections.
Pliers: You’ll definitely want a set of lineman's pliers for twisting thick copper wires together and some needle-nose pliers for detailed work inside the electrical box.
Drill with Auger & Spade Bits: If you plan on running the wire through walls, you’ll need these to drill clean holes through studs.
Choosing the Right Electrical Materials
Picking the correct, high-quality materials is just as critical as the installation itself. Every single component—from the breaker to the outlet—must be properly rated for the circuit's amperage to prevent overheating and fire hazards.
Always look for components that are UL-listed. This stamp means they've been independently tested and certified for safety.
Your shopping list for the actual electrical components will include:
A Two-Pole Circuit Breaker: This breaker has to match the amperage your appliance needs (like a 50A breaker for a NEMA 14-50 outlet). Crucially, it also needs to be compatible with your specific brand of electrical panel (e.g., Square D, Siemens, Eaton).
The Correct Gauge Copper Wire: The wire's thickness, or gauge, is determined by the breaker's amperage. For a standard 50A circuit, you'll need 6-gauge (6 AWG) copper wire. For a complete breakdown, our article on what gauge of wire to use for 50 amps covers the details you need to know.
The 240V Receptacle: This is the outlet itself. The NEMA 14-50 is extremely common for EV chargers and modern dryers, but always double-check that you're buying the one that matches your appliance's plug.
Electrical Box & Conduit: You'll need a sturdy electrical box to house the new outlet. If you're running the wire along a wall surface instead of inside it (which is common in garages), you’ll also need conduit (either metal EMT or PVC) to protect it from damage.
When it comes to 240V receptacles, you'll find a few different types used in garages. Each is designed for a specific amperage and plug shape, so picking the right one is key.
Choosing Your 240V Outlet Type
NEMA Outlet Type | Amperage Rating | Common Garage Uses | Plug Blade Configuration |
|---|---|---|---|
NEMA 14-50 | 50 Amps | EV Chargers, RV Hookups, Electric Ranges | Two vertical blades, one round ground pin, one L-shaped neutral pin. |
NEMA 14-30 | 30 Amps | Electric Dryers, some older EV chargers | Two angled blades, one round ground pin, one L-shaped neutral pin. |
NEMA 6-50 | 50 Amps | Welders, Plasma Cutters, large shop tools | Two vertical blades, one round ground pin. (No neutral wire) |
NEMA 6-20 | 20 Amps | Large Air Compressors, High-power tools | One horizontal blade, one vertical blade, one round ground pin. |
The NEMA 14-50 has become the go-to for residential EV charging due to its versatility and high power capacity, but welders or other heavy machinery might require a NEMA 6-50. Always verify what your specific appliance needs before buying materials.
Professional Tip: Don't try to save a few bucks on materials. The cost difference between a cheap, non-certified outlet and a quality, industrial-grade one is tiny compared to the safety risk of a component failing under the heavy, continuous load of something like an EV charger.
Once you have everything together, you're ready for the hands-on part of the project. If you're feeling at all unsure about selecting the right components or handling the installation, our team at RC Generators and Electric is here to help. Give us a call for a professional consultation in the Los Angeles or Ventura County areas.
Navigating the Installation Process Safely
Alright, this is where the blueprint meets the real world. From here on out, our focus is 100% on safety.
Before we get into the nuts and bolts, let me be crystal clear: this is a walkthrough of the exact process a professional electrician follows. It's for your information only. Messing around inside your home's main electrical panel is incredibly dangerous. For a job with this much on the line, calling a certified electrician from a team like RC Generators and Electric is always the smartest, safest move you can make.
Now, with that essential warning out of the way, let's walk through the steps to properly install a 240v outlet in your garage.
The First and Most Critical Step: Powering Down
The absolute most important thing you do on any electrical job is kill the power. I don't mean just flipping off the new breaker you're about to install. I mean shutting down the entire panel you'll be working in.
Any pro will start by throwing the main breaker, which is usually the big one at the very top of your panel. That should cut electricity to your whole house. But an experienced electrician never, ever trusts a switch. The very next move is to grab a reliable voltage tester and confirm the panel is completely dead. This is a non-negotiable safety check.
Safety Alert: Never assume the power is off just because the lights went out. A voltage tester is the only way to be 100% certain the panel's bus bars (the main metal bars that distribute power) are de-energized before you proceed.
Installing the New Breaker and Running the Cable
Once you've confirmed the panel is dead, it's time to install the new two-pole breaker. You'll carefully take off the panel cover and find two adjacent empty slots. The breaker is designed to snap firmly onto the bus bars, locking in for a secure connection.
With the breaker in, the next phase begins: running the cable from the panel to where the outlet will live in the garage. Honestly, this is often the most physically demanding part of the entire job.
Routing the Wire: The goal here is to find the most direct and protected path. Sometimes that means going up into an attic, down through a crawlspace, or running it right along the surface of the garage walls.
Drilling Through Studs: If the wire has to pass through wall studs, you drill holes directly in the center of the wood. This protects the cable from getting pierced by a drywall screw or nail years down the road.
Using Conduit for Protection: In a garage, it’s really common for wiring to be exposed on the surface of drywall or concrete block. In these spots, the wire must be run inside a protective conduit (like metal EMT or PVC) to shield it from getting damaged.
This part of the process takes some careful planning. You want to minimize the cosmetic damage to your walls while making sure that cable is fully protected from end to end.
Connecting the Receptacle: The Final Connections
After the cable has been pulled to its destination, it's time to wire up the 240V receptacle. The cable gets fed into a securely mounted electrical box, leaving about 8-10 inches of slack inside. That extra length gives you enough room to work comfortably.
You'll carefully strip back the outer jacket of the cable, revealing the individual insulated wires. For a typical 240V circuit, like for a NEMA 14-50 EV charger outlet, you’re going to see four wires:
Two "Hot" Wires: These are usually black and red. Each one carries 120 volts and will connect to the brass-colored screws on the outlet.
One "Neutral" Wire: This is the white wire. It connects to the silver-colored screw.
One "Ground" Wire: This is either bare copper or has green insulation.
Each wire's insulation needs to be stripped back just enough—about 3/4 of an inch—to get a solid, secure connection under the outlet's terminal screws.
The Importance of a Proper Ground Connection
I can't overstate this: the ground wire is your number one safety feature against electrical shock. It’s what provides a safe path for electricity to get back to the panel and trip the breaker if something goes wrong, like a short circuit.
Connecting it is simple but absolutely critical. The bare copper ground wire connects to the green screw on the receptacle. If you're using a metal electrical box, the ground wire also has to be connected to the box itself. This ensures the whole system is properly grounded. A missing or poorly connected ground turns an appliance, or even the outlet itself, into a massive shock hazard.
This whole process, from killing the power to tightening that last screw, demands precision and a real understanding of how electricity works. For homeowners in Los Angeles and Ventura County, having a professional from RC Generators and Electric do the installation guarantees every step is done safely and is fully compliant with local codes. Contact us today for a professional consultation and let our experts handle the power.
Project Costs and When to Hire a Professional
While tackling a DIY project feels rewarding, installing a 240V outlet in your garage is a job where you have to weigh the potential savings against some serious safety risks. Knowing the true cost and, more importantly, when to call in a pro is the most critical part of this project.
One of the first questions we always get is, "What's this going to cost me?" Here in California, the price for a professional installation can vary quite a bit. A simple run from your electrical panel to a nearby spot in the garage will be on the lower end, but a few common factors can drive that number up.
Breaking Down Professional Installation Costs
When you hire a licensed electrician, you’re not just paying for an hour of work—you're paying for their expertise, insurance, and the peace of mind that comes with a safe, code-compliant job.
Here’s what influences the final quote:
Distance From the Electrical Panel: The longer the run from your panel to the garage, the more you'll spend on materials. That heavy-gauge copper wire and conduit aren't cheap, and the labor adds up.
Complexity of the Wire Run: It’s one thing to run conduit along an open garage wall. It’s a whole different ballgame to fish wires through finished drywall, attics, or tight crawlspaces. That extra time and effort will be reflected in the cost.
Your Home's Existing Wiring: Older homes sometimes throw curveballs. If you've got outdated circuits or aluminum wiring, an electrician will need to take extra steps to safely integrate the new high-power outlet.
Panel Capacity: If your electrical panel is already maxed out, you can't just add another big circuit. This often means a panel upgrade is necessary before the 240V outlet can even be installed, which is a much larger project.
While the national average for a 240V outlet installation hovers around $220, that figure can be misleading. Labor rates and the factors above can push the price higher, especially in our area.
Red Flags That Signal It's Time to Call a Pro
Some homeowners definitely have the skills for this job. But there are a few situations where you should put the tools down and pick up the phone. Your safety—and your home's integrity—is never worth the risk.
Don't ever compromise on safety. A mistake with 240 volts isn't like a leaky faucet; it can have devastating consequences. If you run into any of these issues, it's a clear sign to call a certified electrician.
You should absolutely hire a professional if:
Your electrical panel is completely full. If you don't see any open slots for a new double-pole breaker, don't try to get creative. An expert needs to assess the situation.
You have an older home with aluminum wiring. Connecting modern copper circuits to old aluminum wiring requires special connectors and techniques to prevent a fire hazard. It's not a job for a novice.
You are not 100% confident in your ability. If you're even slightly unsure about load calculations, wire gauges, or the specific codes here in Los Angeles or Ventura County, it's best to leave it to someone who does it every day.
Your panel needs an upgrade. If you've done a load calculation and realized your panel can't handle the new EV charger or welder, this is a major electrical overhaul that always requires a licensed professional. You can learn more in our guide on the average cost to upgrade an electrical panel.
When you do decide to hire a professional, it's good to know they are running a business just like any other. Many use tools like AI receptionist services for electricians to make sure they're always responsive and never miss a client's call.
For homeowners in Southern California, RC Generators and Electric has the experience to get this job done right. Our licensed electricians will make sure your new 240V outlet is safe, up to code, and ready to power your workshop or EV for years to come. Contact us today for a professional consultation and quote.
Common Questions About Garage 240V Outlets
When homeowners decide to install a 240V outlet in their garage, some great questions always come up. Getting clear, honest answers is the best way to feel confident about the project and make the right call for your home's electrical system. Let's dig into some of the most common ones we hear.
Is an Industrial-Grade Outlet Worth It for My EV?
Yes. Absolutely. While a standard, residential-grade 240V outlet can work, it's just not built for the kind of punishment an EV charger dishes out.
Think about it this way: your oven draws a lot of power, but only for an hour or so at a time. Your EV charger, on the other hand, will pull that same high level of power for six, eight, or even ten hours straight. Every single night.
That continuous high-amperage draw creates a significant amount of heat. Industrial-grade outlets are built differently—they have much beefier internal contacts, better heat-dissipating materials, and a far more secure connection for the plug.
Here's a key takeaway: Research from the engineers at NeoCharge showed that industrial-grade outlets reduce electrical resistance by 3 to 5 times compared to the residential versions. Less resistance means much less heat buildup, dramatically lowering the risk of the outlet overheating or failing over time. You can learn more about their findings on industrial vs. residential grade outlets on their blog.
For the small difference in cost, upgrading to an industrial-grade NEMA 14-50 outlet is one of the smartest safety moves you can make for your EV charging setup.
My Electrical Panel is Full. What Are My Options?
This is a really common situation, especially in older homes that weren't designed for today's electrical demands. Staring at a panel with no open slots feels like hitting a wall, but you definitely have options. However, this is the point where a DIY project has to stop and a professional electrician needs to step in.
Here are the most common solutions a licensed electrician will look at:
Tandem Breakers: Sometimes called "thin" or "twin" breakers, these clever devices allow two circuits to fit into a single breaker slot, freeing up space. This is only an option if your specific panel model is listed by the manufacturer to accept them.
Installing a Subpanel: If tandem breakers aren't a viable or sufficient solution, the next best step is often to install a subpanel. This is basically a small, secondary breaker box that's fed by a large two-pole breaker in your main panel. It gives you a fresh set of slots for new circuits, including your 240V outlet.
An electrician from a company like RC Generators will perform a detailed load calculation on your main service first. We have to make sure your home's electrical system can even handle the added load from a subpanel and the new high-power circuit. It’s a complex job that requires a deep knowledge of electrical codes.
What Is the Deal with GFCI Protection?
GFCI stands for Ground Fault Circuit Interrupter. You've seen them before—they're the outlets with the little "test" and "reset" buttons in your kitchen and bathroom. Their job is simple but absolutely critical: protecting you from a deadly electrical shock.
A GFCI device is always monitoring the electrical current. If it detects even a tiny imbalance—like electricity finding a path through you to the ground—it snaps the power off in a fraction of a second.
Electrical codes are always being updated for better safety, and current rules require GFCI protection for most outlets in a garage. For a while, though, there were known issues with certain EV chargers causing "nuisance tripping" on GFCI breakers.
The regulations can get tricky and sometimes vary with local amendments here in California. This is exactly why it's so important to work with a local, licensed expert. We know the specific code requirements for Los Angeles and Ventura County and will make sure your installation is 100% safe and compliant.
Navigating a 240V installation involves more than just connecting wires—it’s about ensuring your home’s safety. But what happens when a power outage strikes? Even the best outlet is useless without power. That's where we come in. At RC Generators and Electric, our expertise extends to whole-home backup solutions, including Generac home standby generators and solar-powered battery systems, ensuring you have power during fires, blackouts, and more. For a professional, code-compliant installation and a plan for total home energy security, trust our licensed electricians. Contact us today for a consultation and let us power your home's future.